Showing posts with label photoshop. Show all posts

Thursday, 3 July 2014

How to Make a Vector-Style Woman Composition

Vector graphics design is one of the leading styles for print magazines and in titling of movies right now. In this tutorial, we are going to cover the entire body of a woman with stock vector art by employing some of the basic tools and blending options in Adobe Photoshop. We will also need Adobe Illustrator to open the vector files and to provide a source for importing the vectors into Photoshop.

Preview

You may click the image below to see the full-scale version of what we will be creating in this tutorial.
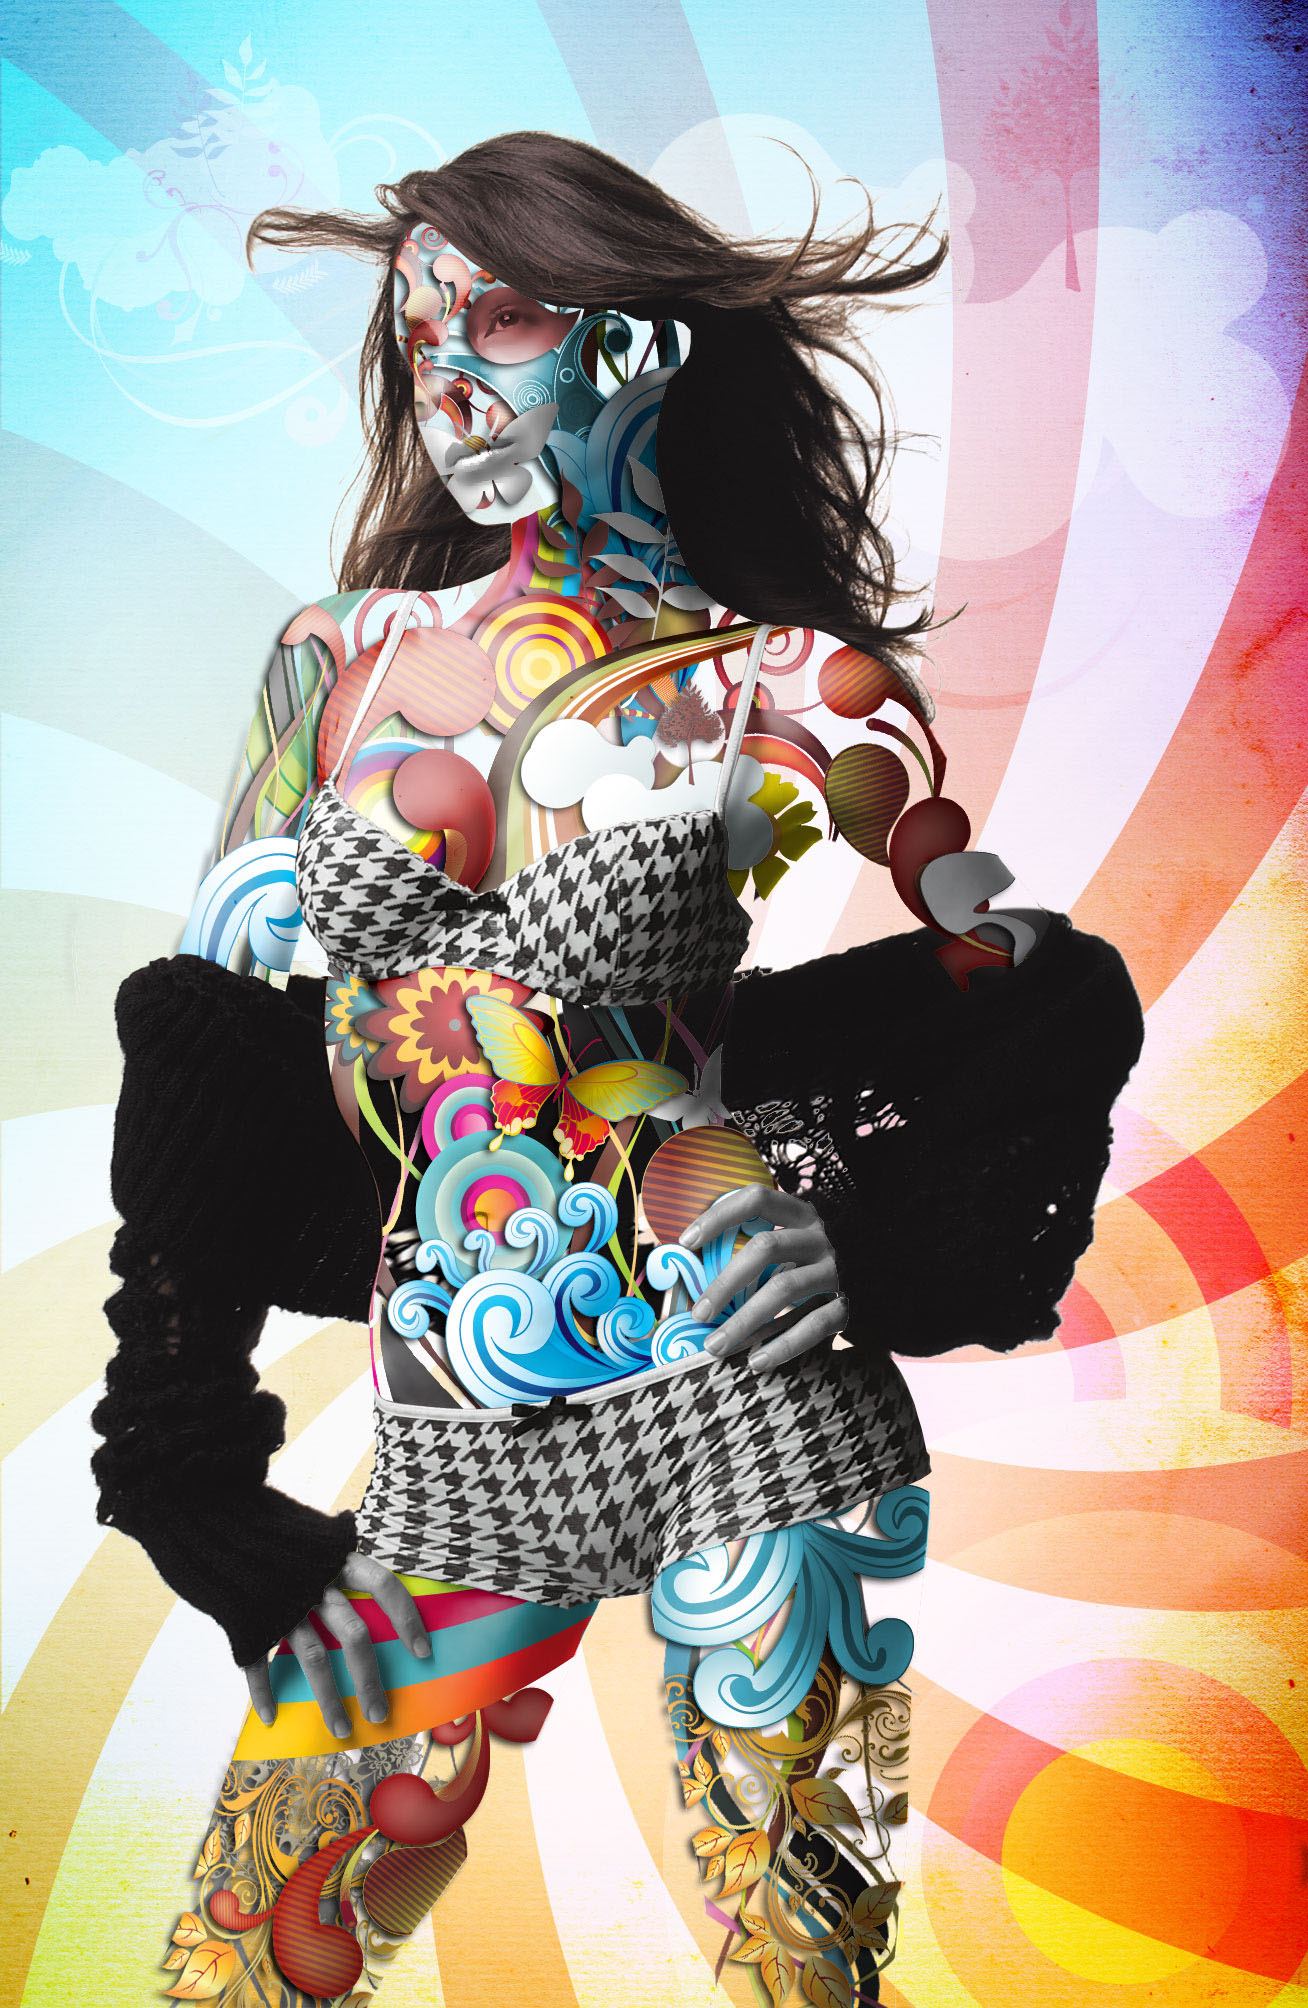
Preview

Resources

Here is a list of graphics assets that we will use.

Model

Vectors

Texture

Step 1: Separate the model’s swimwear into a new layer

To begin, import the model into Photoshop (Female Stock 26 from the Resources listing).
Separate the model's swimwear into a new layer
Take out the Pen Tool (P) and draw a selection around the subject’s clothes (her swimwear). When you have finished the selection, right-click inside it and choose Make Selection to convert the path you just drew into a selection.
Separate the model's swimwear into a new layer
Now press Ctrl/Cmd + J to copy the subject’s swimwear (the selected area) as a new layer.
Separate the model's swimwear into a new layer

Step 2: Separate the model’s skin areas into a new layer

In the same way as Step 1, select around the skin of the model with the Pen Tool (P) and make it a new layer. Name this layer as "skin" to keep the work organized.
Separate the model's skin areas into a new layer

Step 3: Desaturate the skin layer

Now, having the skin layer selected, go to Image > Adjustments > Desaturate (Shift + Ctrl/Cmd + U) to desaturate the skin.
Then adjust the exposure levels (Image > Adjustments > Exposure) of the skin layer. You can utilize the following option values:
  • Exposure: +0.19
  • Offset: +0.0020
  • Gamma Correction: 1.16
Desaturate the skin layer

Step 4: Create the coat and hair layer

Still on the skin layer, choose the Magic Wand Tool (W) from the Tools Panel, and select around the skin of our subject (as shown below).
Create the coat and hair layer
Once finished, right-click on the magic wand selection in the canvas and choose Save Selection so that Photoshop remembers this selection for later.
Now select the "main layer" and go to Select > Load Selection; choose the previously saved selection in the drop down list of the Channel option.
Once the selection is loaded, press Ctrl/Cmd + J to separate the hair, coat and swimwear into a new layer.
Erase the swimwear in the new layer by loading a selection around the swimwear layer (Ctrl/Cmd + click on its thumbnail in the Layers Panel), going back to the new layer, and pressing the Delete key. You might have to erase any remaining swimwear areas manually with the Eraser Tool (E). We’re removing this from the new layer since we already have it in another layer.
Create the coat and hair layer

Step 5: Create the layer with the model’s hands

Go ahead and select the "skin" layer and make a selection around the fingers with the Pen Tool (P), covert it to a selection (right-click inside the pen’s path and choose Make Selection) and then create a new layer with only the subject’s hands on it (Ctrl/Cmd + J).
Create the layer with the model's hands
Put the "skin" and "layer 0" beneath all the layers.

Step 6: Importing vectors from illustrator to Photoshop

Open our first vector resource (new world vector in the Resources listing) in Adobe Illustrator and select a vector shape with the Move Tool (V). Tip: hold Shift to select multiple vector shapes in the artboard.
Importing vectors from illustrator to Photoshop
Once the vector is selected, just drag and drop into your work area in Photoshop.
After importing the vector into Photoshop, right-click the vector layer and select Rasterize Layer.                  
Afterwards, use the Move Tool (V) to position the vector on the subject’s right thigh (I named this layer "vector 1i").
Importing vectors from illustrator to Photoshop

Step 7: Cut out excess areas of the vector shape

Select the shape of the vector with the Magic Wand Tool (W).
Then use the same selection on the "skin" layer and press (Ctrl/Cmd + J) to cut the skin layer into the shape of vector. Name the layer "vector 1".
Importing vectors from illustrator to Photoshop

Step 8: Apply a Smart Blur on "vector 1" layer

With the "vector 1" layer selected, go to Filter > Blur > Smart Blur and adjust the Radius to 3.0 and Threshold to 25.0.
Apply a Smart Blur on "vector 1" layer

Step 9: Change the blending mode

Now select the "vector 1i" layer and change the blending mode to Overlay to let a little bit of its background show through.
Change the blending mode
After that, select both "vector 1" and "vector 1i" layers in the Layers Panel by holding down Ctrl/Cmd while clicking on them. Once selected, right-click on one of them and choose Merge Layers.
Erase unwanted parts manually with the Eraser Tool (E).
Change the blending mode

Step 10: Choose vectors to import into the scene

Vectors must be chosen very carefully because they are central to the aesthetics and concept of the design. In the following example, I have chosen a vector that resembles water (Vector Design 3 from the Resources listing).
Choose vectors to import into the scene

Step 11: Placing the vector

When incorporating the vectors, first open them in Illustrator, select them with the Selection Tool (V) and then import to Photoshop via drag and drop, as indicated in previous steps—this will be the general process for importing all the vectors into the piece. I started my design from abdomen.
Placing the vector

Step 12: Selecting the skin

Having the vector layer active, make a selection around it with Magic Wand Tool (W).
Afterwards, use the selection on the "skin" layer to cut the skin into the vector design shape. Press Ctrl/Cmd + J to make the selected skin a new layer, and name the layer "vector2".
Selecting the skin
Selecting the skin

Step13: Apply a Smart Blur on the vector layer

With the "vector2" layer selected, go to Filter > Blur > Smart Blur. Change the values of Radius to 3.0 and Threshold to about 25.
Apply a Smart Blur on the vector layer

Step 14: Rasterizing imported vector layers

When the vector is imported into Photoshop, it appears as a Vector Smart Object automatically. As a Vector Smart Object, vectors cannot be edited or transformed, so right-click on this layer in the Layers Panel and pick Rasterize Layer. Name the layer "vector 2i".
Rasterizing imported vector layers

Step 15: Change the blending mode to Overlay

Select the "vector 2i" layer and change the blending mode to Overlay. Then select both the "vector2" layers, right-click on one of them and then choose Merge Layers.
Change the blending mode to Overlay

Step 16: Applying shadows on vectors

All the layers should be given a drop shadow to show that they are on top of one another.
I have imported a new vector (Swirls Vector Illustrations Set from the Resources listing) in the similar way as mentioned in the above steps and placed it under the "vector2" layer.
Right-click on the "vector2" layer and then select Blending Options to open up the Layer Styles dialog window. Apply a Drop Shadow layer style, setting the Distance to 6px and Size to about 8px.
Applying shadows on vectors

Step 17: Sequence of Designing

Now it’s time to use your own creative license to arrange the rest of the vectors. Use suggested vectors from the Resources listing—or use your own vectors—to fill in the remaining spaces of our subject using the techniques we have covered in the preceding steps.
Sequence of Designing

Step 18: Fill the gaps

Since there are gaps in between the vectors, the coat of the subject must be visible through them.
Select a part of the coat with the Lasso Tool (L) and press Ctrl/Cmd + J to create a new layer from the chosen area.
Fill the gaps
Utilize the Free Transform command (Ctrl/Cmd + T) to stretch the previously created layer to the right side of the model.
Fill the gaps

Step 19: Painting to fill the remaining gaps

Now make a new layer beneath the "coat" layer and select an area near left elbow with the Lasso Tool (L).
Painting to fill the remaining gaps
Get the Paint Bucket Tool (G) and fill the selected part with a dark grey colour (#403d3d).
Then use the Brush Tool (B) with a brush tip set to an airbrush and Flow to 50% to paint one end with a darker grey colour (#222121).
Painting to fill the remaining gaps

Step 20: Create the background

Though some artists like starting from the bottommost layer (the background of the composition), I prefer focusing on the subject and then designing the background of it as one of the final steps (which makes sense, since the subject is the central focus of the viewer).
Pick a background that matches the design theme. I found a colourful texture set (Texture Set 38 in the Resource listing) that adds a certain depth and texture to our vector woman.
Create the background

Step 21: Final details

To finish off the composition, I selected a few more vectors like sunrays, clouds and circles and placed them above the texture background layer (see the Resources listing to find suggestions of what vectors to use). I changed the blending mode of the sunrays layer to Overlay and the other vectors to Soft Light to let a bit of the texture show through them.
Final details

Tutorial Summary

In this tutorial, I have displayed a method for using stock vectors to create an interesting and popular effect that can be seen in print magazines and advertisements. We used Photoshop to compose the scene. We isolated and separated different parts of our subject into several layers to make it easier for us to work with. We used various vector files, opening them in Illustrator and then importing them into Photoshop. We covered a technique or two for retouching the spots that have gaps in them. Finally, we finished the piece with a textured background and some more vectors for details.
I hope you enjoyed this tutorial. Share your thoughts and ask your questions in the comments. Don’t be shy to show us your own version by including it in the Design Instruct Flickr group pool.

Download Tutorial Source Files

Undress a Giraffe in Photoshop

Have you ever wanted to know what a Giraffe looks like without its spots? If so, this tutorial is for you, you pervert! Today, we will demonstrate how to undress a giraffe by removing its spots. We will then show how to turn its spots into an outfit that will be draped over an ironing board. Pretty cool! Let’s get started!
The following assets were used during the production of this tutorial.
Let’s start by creating a new document in Adobe Photoshop. The size of document is 2200×3200 pixels at 72 px/inch of resolution. Start by filling the background with any color (white for example).
Undress a Giraffe in Photoshop
First of all let’s create a simple and plain background. You may crate your own more interesting and multi-layered background - old style wallpapers or may be savanna landscape.
We will use gradients and filters. Unlock the "Background" - right click on background thumbnail and choose "Layer from background", click "Add a layer style" small iconUndress a Giraffe in Photoshop in the bottom part of the Layers Palette. Apply "Color Overlay" and "Gradient Overlay" styles. Use setting and colors just like on the screen shots below.
Undress a Giraffe in Photoshop
Create a new empty layer above background layer - click "Create a new layer" icon Undress a Giraffe in Photoshop. Choose huge soft, light color Brush Tool and draw a spot in the central part of the document.
Undress a Giraffe in Photoshop
Create a new layer above light spot layer. Go to Menu > Filter > Render > Clouds.
Choose Filters menu again and find Blur filter, apply Motion Blur and Gaussian Blur filters to clouds layer one by one. Add Layer Mask to blurred layer, click "Add Layer Mask" iconUndress a Giraffe in Photoshop. Make Layer Mask active and fill it with black and white Reflected Gradient in the bottom part of the document.
Undress a Giraffe in Photoshop
In order to create Vignette effect, choose Menu > Filter > Distort > Lens Correction > play with Vignette Amount & Midpoint settings.
Undress a Giraffe in Photoshop
Merge all created layers. Make lighter the right part of our background, the light source will be directed from right. Make active Quick Mask Mode Undress a Giraffe in Photoshop, choose Linear "black and white" Gradient Tool. Fill layer with gradient from left to right edge of the document. The left side should become pink. Make Quick Mask inactive (clickUndress a Giraffe in Photoshop icon).
Undress a Giraffe in Photoshop
You will have selected area like on the screen shot. Play with Levels settings. Menu > Image > Adjustments Levels, move gray marker left. You can add small noise effect, to the created background layer. Go to Menu > Filter > Noise > Add Noise > 4; Uniform.
Undress a Giraffe in Photoshop
Insert giraffe image. Menu > File > Place - choose giraffe .jpg file. In order to separate giraffe silhouette from background, choose Polygonal Lasso Tool. You may use other methods, but this one is pretty easy and convenient. Click in the giraffe silhouette area to set the starting point. Continue clicking to set endpoints for subsequent segments. To close the selection border click over the starting point.
Undress a Giraffe in Photoshop
Click Refine Edge to improve the quality of a selection’s edges.
Undress a Giraffe in Photoshop
Use following Refine Edge settings. Click "Ok" and inverse selection: Menu > Select > Inverse. Erase or clear selected background area (Menu > Edit > Clear).
Undress a Giraffe in Photoshop
In order to retouch and improve color balance of the Giraffe image choose Shadows /Highlights from Image > Adjustments menu. Apply following settings:
Undress a Giraffe in Photoshop
Add the new adjustments layers above Giraffe layer- "Levels", "Color Balance", "Selective Color Options", click Undress a Giraffe in Photoshop icon in the bottom menu of the Layers Palette. Select all adjustments layers (make them active), right click > choose "Create Clipping Mask". Apply setting for each adjustment layer like on the examples below. Fill "Selective Color" and "Levels" Layers Masks with linear "black and white" gradient.
Undress a Giraffe in Photoshop
Load selection for white stripes with Magic Wand Tool. It is not necessary to load selection for all white spots at once, you may do this work by portions. Go to Menu > Select > Modify > Expand (expand by 1px).
Undress a Giraffe in Photoshop
Duplicate the retouched Giraffe layer and fill selected stripes with brown color in the duplicated layer, name it "Clean skin layer". The original retouched Giraffe layer will be needed in the future steps, be sure that the original layer is below duplicate). Use 0% hardness brush and hold down the "Alt" key to activate Eyedropper Tool and find right color next to each stripe.
Undress a Giraffe in Photoshop
You should have something like this and you may fill out white areas with color step by step. Brown color stripes will be helpful to create more accurate result.
Undress a Giraffe in Photoshop
To remove stripes traces, use Patch Tool. Drag the selection border to the clean and textured skin area. When you release the mouse button, the trace of the selected area is patched with the sampled pixels. Repeat these actions to mask all stripe traces.
Undress a Giraffe in Photoshop
You will have giraffe body without spots.
Undress a Giraffe in Photoshop
Correct the "Clean skin" layer edges with smooth Eraser Tool to create blending effect between original (spotty) bottom layer and "Clean skin" layer.
Undress a Giraffe in Photoshop
Mask the small defects with Patch Tool and Spot Healing Brush Tool. Choose a brush size in the options bar. A brush that is slightly larger than the area you want to fix works best so that you can cover the entire area with one click.
Undress a Giraffe in Photoshop
Now we can change skin color and levels balance. Add "Gradient Map", "Levels" and "Black and White" adjustment layers and create Clipping Mask for "Clean skin" layer. Apply following settings.
Undress a Giraffe in Photoshop
Insert Ironing Board image, it doesn't require any changes and adjustments.
Undress a Giraffe in Photoshop
Return to the retouched Giraffe layer and duplicate it once again. We will make Giraffe's jacket using a new copy. Erase head and legs area.
Undress a Giraffe in Photoshop
This is a shape for our future jacket.
Undress a Giraffe in Photoshop
Correct the shape of the spotty jacket using Warp Transformation. Make a shape flatter. Go to Edit > Transform >Warp.
Undress a Giraffe in Photoshop
Liquify filter from Filters menu will help you to create flat shape effect. Use large Forward Warp Tool to correct large areas and smaller Warp Tool size to work with parts such as legs or skin wrinkles.
Undress a Giraffe in Photoshop
Now we have flatter shape for the jacket.
Undress a Giraffe in Photoshop
Apply Free transformation to jacket shape, make it smaller and little bit stretched by horizontal.
Undress a Giraffe in Photoshop
Select top part (above ironing board bottom edge) of the spotty jacket, cut out this part and paste it into a new layer. Stretch it by vertical using Free Transformation like on the example below.
Undress a Giraffe in Photoshop
Apply Perspective Transformation to the top edge, Menu > Edit > Transform > Perspective.
Undress a Giraffe in Photoshop
Keep active modified top part of jacket layer. Cut out top part again (above ironing board top edge), just leave stripe above trouser-legs ("Layer 20" on the screen shot below). Stretch top part by vertical again.
Undress a Giraffe in Photoshop
Apply Perspective transformation.
Undress a Giraffe in Photoshop
Make active top layer of the jacket layers. Erase iron and area above ironing board. Try to imitate skin wrinkles shape.
Undress a Giraffe in Photoshop
Draw white line with Line Tool in a new layer above giraffe jacket, use weight around 13 px and apply Gaussian Blur Filter (R=10px).
Undress a Giraffe in Photoshop
Change Blending Mode for this layer on "Overlay".
Undress a Giraffe in Photoshop
Copy neck area from the original retouched Giraffe layer. Paste it into a new layer below ironing board layer. Apply flip Vertical transformation to this shape and Gradient Overlay layer style effect with settings like on the screen shot below.
Undress a Giraffe in Photoshop
The final part of our work is creating the drop shadow effect for Giraffe and Ironing board. Load selection for Giraffe shape (Command/Ctrl + click Giraffe layer thumbnail). Create a new layer below of the all visible giraffe layers. Fill selection with any color.
Undress a Giraffe in Photoshop
Apply Distort transformation to created shape. Edit > Transform > Distort. Move top edge and left bottom corner left and down. Try to combine drop shadow and legs in same points. Correct central legs shadow with Eraser Tool.
Undress a Giraffe in Photoshop
This is result of our transformation.
Undress a Giraffe in Photoshop
Set Fill parameter 0% and Opacity around 20% for the shadow layer. Apply Gradient Overlay layer style effect. Make active Quick mask Mode, fill layer with linear gradient like on the example below.
Undress a Giraffe in Photoshop
Click Quick Mask icon and apply Gaussian Blur to the selected area of the shadow layer.
Undress a Giraffe in Photoshop
Duplicate shadow layer and apply Gaussian Blur filter with radius = 50 px and change Opacity to 70-75%.
Undress a Giraffe in Photoshop
Advertisement
Create shadow effect for the ironing board using the same method. Load selection for ironing board and jacket, Apply Fill = 0%, Gradient Overlay effect with the same parameters. Apply Blurring 10 px and duplicate shadow layer with Opacity 75% and More Blurring.
Undress a Giraffe in Photoshop
In today’s tutorial I will show you how to create a space photo manipulation by mixing stars and different Photoshop techniques. Layered PSD file included. Let’s get started!

Final Image Preview

How to Create a Space Girl Photo Manipulation in Adobe Photoshop CS4
Start working by opening in Adobe Photoshop CS4 a space photo like this one:
How to Create a Space Girl Photo Manipulation in Adobe Photoshop CS4
Find a stock photo with a model represented on it, I used this photo from deviantart. I would like to thank the author of this photo:
How to Create a Space Girl Photo Manipulation in Adobe Photoshop CS4
Remove the background using your favorite tools like Pen Tool (P), Magic Wand Tool (W), Magnetic Lasso (L) or even a simple Filter>Extract and insert the image on a new layer in our main document.
How to Create a Space Girl Photo Manipulation in Adobe Photoshop CS4
Click on Add a layer style icon from bottom part of the Layers panel and select Inner Glow
How to Create a Space Girl Photo Manipulation in Adobe Photoshop CS4
We’ve got the next inner glow effect around girl:
How to Create a Space Girl Photo Manipulation in Adobe Photoshop CS4
Click now on the bottom part of the Layers panel on Add layer mask icon and choose after that the Soft Round brush of black color (Opacity 15%)
How to Create a Space Girl Photo Manipulation in Adobe Photoshop CS4
Using Soft Round brush paint on the mask to hide the girl’s legs as shown:
How to Create a Space Girl Photo Manipulation in Adobe Photoshop CS4
Create a new layer and select for it a Soft Round brush of yellow color (Opacity 10%) to paint the layer:
How to Create a Space Girl Photo Manipulation in Adobe Photoshop CS4
Set Blending mode for this layer to Saturation
How to Create a Space Girl Photo Manipulation in Adobe Photoshop CS4
Hold down Alt (Windows) or Option (Mac OS) and click between the layers of the yellow brush and the layer containing the girl (on the Layers panel) to create a clipping mask
How to Create a Space Girl Photo Manipulation in Adobe Photoshop CS4
Now we have the content of the layer containing the yellow color only visible within the content of the layer containing the girl
How to Create a Space Girl Photo Manipulation in Adobe Photoshop CS4
Create a new layer and select the Soft Round brush with #0000FF color (Opacity20%).
How to Create a Space Girl Photo Manipulation in Adobe Photoshop CS4
Paint the background as shown and place this layer under the layer with the girl on it:
How to Create a Space Girl Photo Manipulation in Adobe Photoshop CS4
On the next new layer we’ll apply the above used brush to continue painting the background with the color #00B4F6 (Opacity20%). This layer will be situated under the girl’s layer:
How to Create a Space Girl Photo Manipulation in Adobe Photoshop CS4
Create a new layer and apply here the Soft Round brush to paint the bottom part of the picture with violet color (Opacity 20%)
How to Create a Space Girl Photo Manipulation in Adobe Photoshop CS4
Set the Blending mode to Screen for this layer
How to Create a Space Girl Photo Manipulation in Adobe Photoshop CS4
Use again the Soft Round brush and paint with blue color on background. This layer will be situated under the layer containing the girl:
How to Create a Space Girl Photo Manipulation in Adobe Photoshop CS4
Next there will be used again the soft brush with green color this time and Opacity – 20%.
How to Create a Space Girl Photo Manipulation in Adobe Photoshop CS4
Create a new layer and apply on it the Soft Round brush to paint on the background as shown.
How to Create a Space Girl Photo Manipulation in Adobe Photoshop CS4
The brush’s color is yellow (Opacity 15%). Place this layer under the girl’s layer.
How to Create a Space Girl Photo Manipulation in Adobe Photoshop CS4
Set the Blending mode for this layer to Overlay
How to Create a Space Girl Photo Manipulation in Adobe Photoshop CS4
On the next new layer we’ll use the Soft Round brush of white color (Opacity 20%) to represent several lines, like those from below. This layer needs to be situated under the girl’s layer:
How to Create a Space Girl Photo Manipulation in Adobe Photoshop CS4
Set the Blending mode to Overlay for this layer
How to Create a Space Girl Photo Manipulation in Adobe Photoshop CS4
Let’s create the next new layer and apply on it the same soft brush of white color (Opacity 15%) to make lighter the girl’s body. This layer needs to be placed lower than the girl’s layer:
How to Create a Space Girl Photo Manipulation in Adobe Photoshop CS4
Next we’ll make the girl’s arm look more illuminated. In this case we’ll create a new layer and use here the Soft Round brush
How to Create a Space Girl Photo Manipulation in Adobe Photoshop CS4
Paint firstly with red color (Opacity 15%) the necessary element and then use the color #FDCD9E
How to Create a Space Girl Photo Manipulation in Adobe Photoshop CS4
- See more at: http://www.adobetutorialz.com/articles/30970316/1/how-to-create-a-space-girl-photo-manipulation#sthash.onrXknuw.dpuf
In today’s tutorial I will show you how to create a space photo manipulation by mixing stars and different Photoshop techniques. Layered PSD file included. Let’s get started!

Final Image Preview

How to Create a Space Girl Photo Manipulation in Adobe Photoshop CS4
Start working by opening in Adobe Photoshop CS4 a space photo like this one:
How to Create a Space Girl Photo Manipulation in Adobe Photoshop CS4
Find a stock photo with a model represented on it, I used this photo from deviantart. I would like to thank the author of this photo:
How to Create a Space Girl Photo Manipulation in Adobe Photoshop CS4
Remove the background using your favorite tools like Pen Tool (P), Magic Wand Tool (W), Magnetic Lasso (L) or even a simple Filter>Extract and insert the image on a new layer in our main document.
How to Create a Space Girl Photo Manipulation in Adobe Photoshop CS4
Click on Add a layer style icon from bottom part of the Layers panel and select Inner Glow
How to Create a Space Girl Photo Manipulation in Adobe Photoshop CS4
We’ve got the next inner glow effect around girl:
How to Create a Space Girl Photo Manipulation in Adobe Photoshop CS4
Click now on the bottom part of the Layers panel on Add layer mask icon and choose after that the Soft Round brush of black color (Opacity 15%)
How to Create a Space Girl Photo Manipulation in Adobe Photoshop CS4
Using Soft Round brush paint on the mask to hide the girl’s legs as shown:
How to Create a Space Girl Photo Manipulation in Adobe Photoshop CS4
Create a new layer and select for it a Soft Round brush of yellow color (Opacity 10%) to paint the layer:
How to Create a Space Girl Photo Manipulation in Adobe Photoshop CS4
Set Blending mode for this layer to Saturation
How to Create a Space Girl Photo Manipulation in Adobe Photoshop CS4
Hold down Alt (Windows) or Option (Mac OS) and click between the layers of the yellow brush and the layer containing the girl (on the Layers panel) to create a clipping mask
How to Create a Space Girl Photo Manipulation in Adobe Photoshop CS4
Now we have the content of the layer containing the yellow color only visible within the content of the layer containing the girl
How to Create a Space Girl Photo Manipulation in Adobe Photoshop CS4
Create a new layer and select the Soft Round brush with #0000FF color (Opacity20%).
How to Create a Space Girl Photo Manipulation in Adobe Photoshop CS4
Paint the background as shown and place this layer under the layer with the girl on it:
How to Create a Space Girl Photo Manipulation in Adobe Photoshop CS4
On the next new layer we’ll apply the above used brush to continue painting the background with the color #00B4F6 (Opacity20%). This layer will be situated under the girl’s layer:
How to Create a Space Girl Photo Manipulation in Adobe Photoshop CS4
Create a new layer and apply here the Soft Round brush to paint the bottom part of the picture with violet color (Opacity 20%)
How to Create a Space Girl Photo Manipulation in Adobe Photoshop CS4
Set the Blending mode to Screen for this layer
How to Create a Space Girl Photo Manipulation in Adobe Photoshop CS4
Use again the Soft Round brush and paint with blue color on background. This layer will be situated under the layer containing the girl:
How to Create a Space Girl Photo Manipulation in Adobe Photoshop CS4
Next there will be used again the soft brush with green color this time and Opacity – 20%.
How to Create a Space Girl Photo Manipulation in Adobe Photoshop CS4
Create a new layer and apply on it the Soft Round brush to paint on the background as shown.
How to Create a Space Girl Photo Manipulation in Adobe Photoshop CS4
The brush’s color is yellow (Opacity 15%). Place this layer under the girl’s layer.
How to Create a Space Girl Photo Manipulation in Adobe Photoshop CS4
Set the Blending mode for this layer to Overlay
How to Create a Space Girl Photo Manipulation in Adobe Photoshop CS4
On the next new layer we’ll use the Soft Round brush of white color (Opacity 20%) to represent several lines, like those from below. This layer needs to be situated under the girl’s layer:
How to Create a Space Girl Photo Manipulation in Adobe Photoshop CS4
Set the Blending mode to Overlay for this layer
How to Create a Space Girl Photo Manipulation in Adobe Photoshop CS4
Let’s create the next new layer and apply on it the same soft brush of white color (Opacity 15%) to make lighter the girl’s body. This layer needs to be placed lower than the girl’s layer:
How to Create a Space Girl Photo Manipulation in Adobe Photoshop CS4
Next we’ll make the girl’s arm look more illuminated. In this case we’ll create a new layer and use here the Soft Round brush
How to Create a Space Girl Photo Manipulation in Adobe Photoshop CS4
Paint firstly with red color (Opacity 15%) the necessary element and then use the color #FDCD9E
How to Create a Space Girl Photo Manipulation in Adobe Photoshop CS4
- See more at: http://www.adobetutorialz.com/articles/30970316/1/how-to-create-a-space-girl-photo-manipulation#sthash.onrXknuw.dpuf